|
|
|
|
|
|
|
|
|
|
|
Designing a track plan used to be a lot of hard work!
|
|
|
Pages and pages of doodling and more pages of "almost to scale" drawings! Then, finally, the umpteenth attempt to get all the features in there precisely to scale and hurray, a trackplan!
|
|
|
I remember the first large layout I designed for a customer; three separate levels with distinctly different scenery! A narrow gauge empire being connected to a truncated standard gauge empire. All designed by hand with the help of predesigned turnout templates.
|
|
|
Of course the irony was that I had already purchased a copy of CADrail v 4, but didn't think I had the time to learn how to use it. I needed to get the job done!
|
|
|
Boy, did I ever question my sanity after I learned to use CADrail shortly afterwards; just the revisions and modifications alone would have taken no time at all!
|
|
|
In the meantime CADrail has progressed to version 8 and, yes, it get's easier to use with each progressive version. I don't use paper to doodle anymore, it's just as easy to do on the computer and more accurate. As a matter of fact I would call it high precision doodling
|
|
|
After establishing the relative marker points in the garden - namely staking out a grid which was referenced to the house - it was time to get to the drafting stage.But actually long before that ever happened the Staging yard in the garage was designed and built.
|
|
|
|
|
|
|
|
Staging
|
|
|
|
|
|
|
|
|
|
|
|
|
|
|
|
|
|
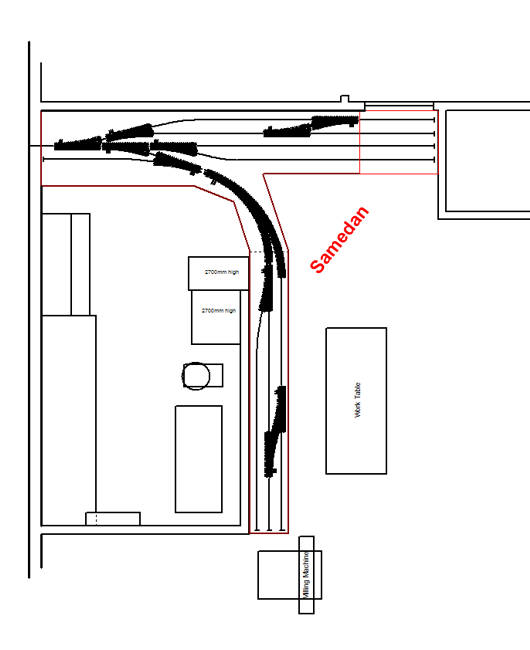
The tracks for Staging are mounted in a shelf which is used for various purposes.
|
|
|
The total length is only 4m and the max width is 0.95m.
|
|
|
Using LGBs standard R1 turnouts saved a lot of room, which was one of the prime considerations. Yet more room was saved by using three way turnouts where possible.
|
|
|
Tracks 1 and 2 are for passenger trains (the station is supposedly along the wall). Track 2a is just long enough to clear a Krok (Ge 6/6'). 1a can be used to store cars.
Track 3 is the freight track. Tracks 4 and 5 are used for freight car storage.
|
|
|
Just enough track and features to make things operational without being a real pain.
|
|
|
Cars can easily be placed or removed at the end of the tracks by the stairs. It is almost like a fiddle yard!
|
|
|
|
|
|
|
|
Eight years on
|
|
|
|
... or the best layed plans...
|
|
|
|
|
|
|
|
|
Finally it was time to do some real testing. A few engines had been converted to DCC and many of the cars equipped with Kadee couplers. The turnouts could be thrown from the panel or the DCC cabs. But there was still enough rolling stock in original config to try out with the LGB couplers. It was time to do some real switching ... what a disappointment! What at the newbie stage ten years ago was still gospel i.e. LGB and the R1 will always work together, turned out to be wishful thinking, reality was completely different.
|
|
|
Testing started with the Ge 2/4 and LGB freightcars with Kadee couplers. Pulling the consist worked reasonably well, pushing a consist is a nightmare. Add to that the stalling of the Ge2/4 on the threeway R1 turnouts - the wheelbase is perfectly dimensioned to end up on the insulated frogs.
|
|
|
How did the LGB couplers fare? Only mariginally better, too many derailments when consists are pushed.
|
|
|
It was now time to find the space for the required changes. Many variations on a theme and in the end the following was decided on.
|
|
|
|
|
|
|
|
|
|
|
|
|
|
|
|
Doing it over will mean doing it right: scratchbuilt #4 turnouts with Code215 rail and the same for the track.
|
|
|
Tracks 1-4 will be the freight section, 5 the programming and engine track, 6-8 for the passenger portion. Operationally it will mean an engine change for every train.
|
|
|
|
|
|
|
|
First Stage
|
|
|
|
|
|
|
|
|
|
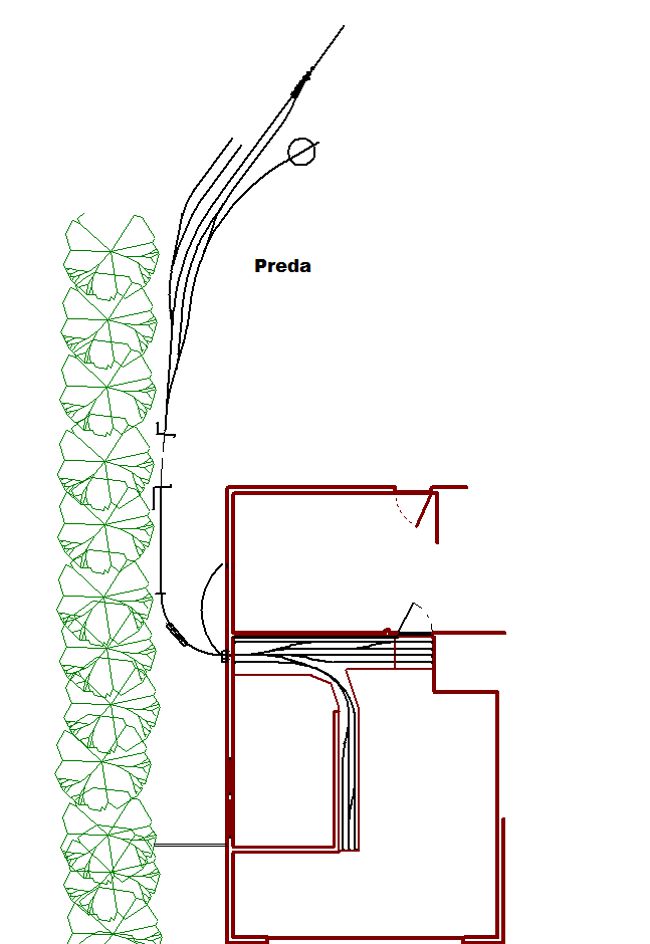
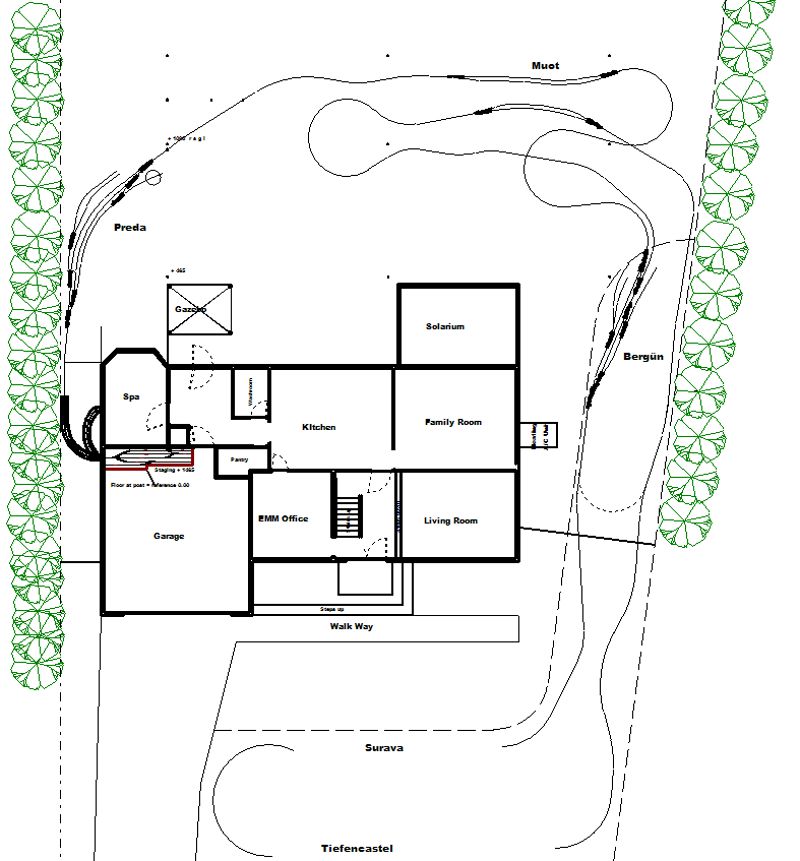
The first stage of construction is Staging to Preda. As can be seen on the track plan there are a few challenges in this section! Not least of which is the pivoting bridge which is modelled after the Landwasser Viaduct.
|
|
|
|
|
|
|
|
|
Track plan for the first stage. All of the track is elevated.
Track reaches ground level just past the arrow at the top of the plan.
Shrubbery on left of plan is a tall cedar hedge.
Reference at bottom of plan is 1m and 3ft respectively.
|
|
|
|
|
|
|
|
|
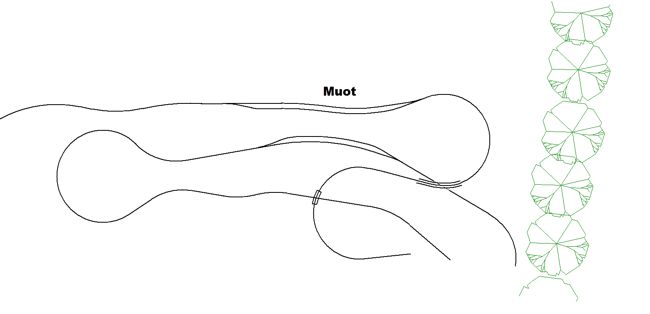
Section of trackplan with Muot and the loops leading down to Bergün.
Below Muot is the passing siding of the continuous run loop
|
|
|
|
|
|
|
|
|
|
|
|
|
|
|
|
|
|
|
|
To Bergün
|
|
|
|
|
|
|
|
|
|
Overall track plan from Staging to Bergün.
Note the continuous run loop that starts at Bergün.
|
|
|
|
|
|
|
That was the plan back in 2002!
|
|
|
Time flies but one keeps contemplating and re-evaluating. The first casualty was the existing fish pond, neither location nor the execution was up to the standards. In addition there were the loops between “Muot” and “Bergün”, the resulting grade was too close to the maximum and since we experience frost, ice and snow even at our level in the Okanagan a gentler grade was better. More on that on the next page.
|
|
|
|
|
|
|
|
|
|
|
Next page
|
|
|
|
|
|